Are you still waiting for users to open your app to engage with them? What if I told you your app could speak to your users anytime, anywhere, even when it’s closed? Welcome to the game-changing world of push notifications in .NET MAUI! In this guide, you’ll unlock the secrets of keeping your audience connected, informed, and coming back for more. Let’s dive into how you can make your app proactively communicate and thrive in the mobile-first world.
Understanding Push Notifications in .NET MAUI
What are Push Notifications?
Push notifications are instant, user-focused messages sent directly to a user’s device from a remote server, even when the app is not actively running. Unlike traditional messaging, push notifications can wake your app to deliver valuable content. Examples include:
- New message alerts in chat apps.
- Promotional offers in e-commerce apps.
- Reminders for upcoming events.
How They Work Under the Hood
Push notifications rely on a combination of client and server infrastructure:
- Client Registration: The app registers with the platform’s notification service and receives a unique device token.
- Server Messaging: Your backend uses this token to send messages through services like Firebase Cloud Messaging (FCM) or Apple Push Notification Service (APNs).
- Delivery: The platform’s notification service delivers the message to the user’s device, waking the app if necessary.
Benefits of Implementing Push Notifications in Your MAUI App
- Boost User Engagement: Remind users of important updates or features.
- Drive Conversions: Send timely discounts or promotions.
- Improve Retention: Keep users coming back with relevant, personalized content.
- Instant Communication: Reach users instantly across devices.
Integrating Firebase Cloud Messaging (FCM)
Why FCM?
Firebase Cloud Messaging is robust, scalable, and supports both Android and iOS with minimal configuration. It offers:
- Free quota for small to medium apps.
- High delivery reliability.
- Data and notification payloads.
Creating a Firebase Project
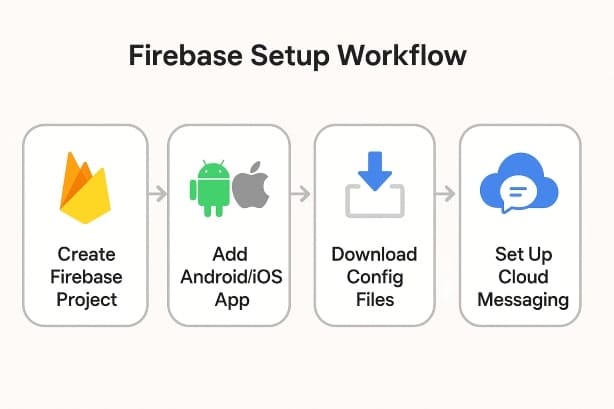
- Navigate to Firebase Console.
- Create a new project and follow the guided setup.
- Add your Android/iOS app to the project.
- Download
google-services.json(Android) orGoogleService-Info.plist(iOS).
Obtain Server Key and Sender ID
Go to Project Settings > Cloud Messaging and:
- Server Key: Used by your backend to authenticate push messages.
- Sender ID: Identifies your Firebase project.
Android Setup
- Place
google-services.jsoninPlatforms/Androidfolder. - Update
AndroidManifest.xmlwith necessary permissions:
<uses-permission android:name="android.permission.INTERNET" />
<uses-permission android:name="android.permission.RECEIVE_BOOT_COMPLETED" />- Initialize Firebase in
MainActivity.cs:
FirebasePushNotificationManager.Initialize(this, true);iOS Setup
- Generate an APNs Key in your Apple Developer account.
- Enable Push Notifications in Xcode project capabilities.
- Add
GoogleService-Info.plistto your iOS project root. - Modify
AppDelegate.cs:
FirebasePushNotificationManager.Initialize(options, true);Implementing Push Notification Logic
Add NuGet Packages
Install the plugin via command line:
dotnet add package Plugin.FirebasePushNotificationOr use the Visual Studio NuGet Package Manager.
Requesting Permissions
iOS requires explicit user permission for notifications:
UNUserNotificationCenter.Current.RequestAuthorization(
    UNAuthorizationOptions.Alert | UNAuthorizationOptions.Badge | UNAuthorizationOptions.Sound,
    (approved, error) => {
        if (approved) Console.WriteLine("Permission granted");
        else Console.WriteLine("Permission denied");
    });
Registering for Notifications
Subscribe to token refresh to handle new device tokens:
CrossFirebasePushNotification.Current.OnTokenRefresh += (s, p) =>
{
    Debug.WriteLine($"Device Token: {p.Token}");
};
Handling Incoming Notifications
Foreground:
CrossFirebasePushNotification.Current.OnNotificationReceived += (s, p) =>
{
    Debug.WriteLine("Notification Received while in foreground");
    foreach (var data in p.Data)
    {
        Console.WriteLine($"{data.Key}: {data.Value}");
    }
};
Background & Terminated:
Ensure correct permissions. Payload data is managed by the OS, but you can capture events when the app resumes.
Customizing Notifications
Custom Payloads
Define payloads to include additional data:
{
  "data": {
    "action": "navigate",
    "page": "DetailsPage",
    "itemId": "42"
  },
  "to": "device_token"
}
Handle Data Messages
React to user interactions:
CrossFirebasePushNotification.Current.OnNotificationOpened += (s, p) =>
{
    if (p.Data.TryGetValue("action", out var action) && action == "navigate")
    {
        var page = p.Data["page"].ToString();
        Console.WriteLine($"Navigate to: {page}");
        // Trigger navigation logic here.
    }
};
Displaying Custom UI
Tailor the user experience:
- Show modal dialogues for critical alerts.
- Update app badges.
- Display in-app banners for active users.
Testing Your Push Notifications
Using Firebase Console
- Select your Firebase project.
- Navigate to Cloud Messaging.
- Create a new message and target your app instance.
Debugging Tips
- Use
adb logcatfor Android logs:
adb logcat | grep Firebase- Monitor iOS logs via Xcode.
- Check your backend for accurate token handling.
Validate Device Tokens
Always log and verify tokens:
CrossFirebasePushNotification.Current.OnTokenRefresh += (s, p) =>
{
    Console.WriteLine($"New Token: {p.Token}");
};
Store tokens securely on your server for later use.
Best Practices for Push Notifications
- Respect User Preferences: Implement in-app toggles for notification categories.
- Mind Frequency: Avoid notification fatigue by spacing out messages.
- Use Notification Channels (Android): Categorize messages for better management and user control.
- Handle Permissions Gracefully (iOS): Educate users on benefits before requesting permissions.
- Secure Token Management: Encrypt and manage tokens responsibly.
FAQ: Essential Questions about Push Notifications in .NET MAUI
Yes! Send data-only payloads to perform background updates without alerting the user.
Yes. Either use your backend or Firebase Cloud Functions to send messages programmatically.
While FCM is the most seamless, you can explore services like Azure Notification Hubs or OneSignal.
Use emulators and physical devices. Test while the app is foregrounded, backgrounded, and terminated to cover all scenarios.
Conclusion: Push Notifications in .NET MAUI Are Game-Changers!
As you can see, implementing push notifications in your .NET MAUI app is not only achievable but also incredibly powerful. Imagine the possibilities: engaging your users at the right moment, delivering value, and creating sticky, memorable app experiences!
Take this guide, experiment with real use cases, and supercharge your apps today. Got questions or faced issues? Drop a comment below, and let’s debug together! Subscribe for more practical MAUI and .NET development insights.