
Are you still juggling React on the front end and ASP.NET on the back end just to ship a simple CRUD? What if you could build the entire web stack in C#, share models end‑to‑end, and keep your brain in one language all day? That’s exactly why Blazor exists – and why it’s now my default choice for many .NET web apps.
Blazor in one paragraph
Blazor is a component-based web UI framework in .NET. You write Razor components (.razor files) in C#/HTML, and Blazor renders them either on the server (over SignalR), in the browser via WebAssembly (WASM), in native shells via .NET MAUI (Hybrid), or with Server-Side Rendering (SSR) plus progressive interactivity. Same components, multiple render modes.
Hosting & render models (when to use which)
Blazor has four practical ways to run UI code. Think of them as a spectrum between instant load and full offline/edge execution.
1) Blazor Server
- How it works: Components run on the server; UI diffs (events & DOM patches) travel via SignalR.
- Pros: Fast first render; tiny payloads; .NET libraries “just work”; server secrets stay server-side.
- Cons: Requires persistent connection; latency affects UX; scale depends on server resources/circuits.
- Use when: Intranet/line-of-business apps, dashboards, forms-heavy portals, authenticated systems.
2) Blazor WebAssembly (WASM)
- How it works: Components and .NET runtime download to the browser; run client-side.
- Pros: Offline capable; minimal server load; edge/CDN friendly; no server roundtrips for events.
- Cons: Initial download; limited browser sandbox; need to call APIs for server data.
- Use when: Public sites, offline-friendly apps, multi-region static hosting, scaling to zero.
3) Blazor SSR + Interactive (Blazor Web App)
- How it works: Pages render on the server (great SEO & TTFB). Interactivity can hydrate as Server or WASM per component or page. This is the “best of both” template.
- Pros: SEO + perf out of the box; progressive enhancement; choose per-route render mode.
- Cons: Slightly higher complexity; think about where state lives.
- Use when: You want SSR speed/SEO and rich interactivity on selected parts.
4) Blazor Hybrid (MAUI)
- How it works: Razor components render in a native WebView, calling local .NET APIs.
- Pros: Access to native APIs; reuse UI + logic across desktop/mobile.
- Cons: App store distribution; larger app size.
- Use when: You want a desktop/mobile app without rewriting your UI.
Quick decision matrix
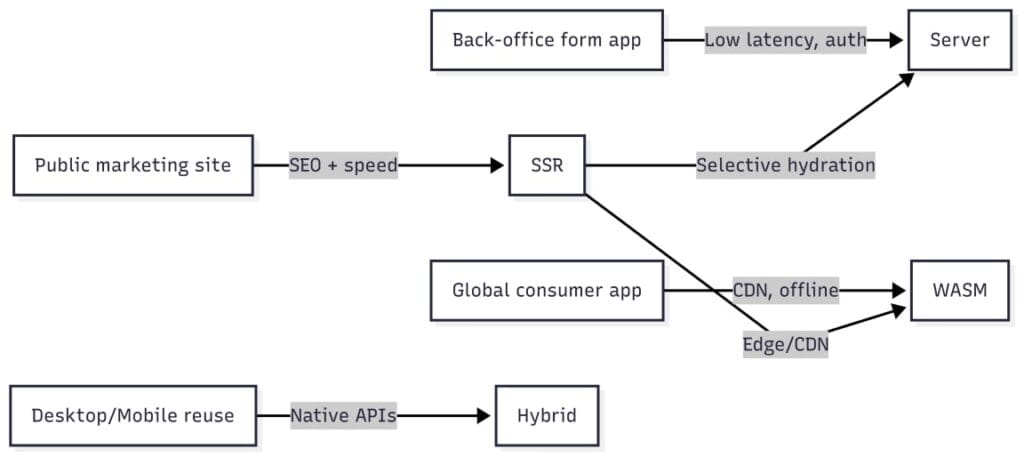
Rule of thumb: Start with Blazor Web App (SSR). Hydrate interactivity as Server for internal tools, as WASM for public/edge routes, and keep purely static pages as SSR-only.
Project structure & bootstrapping
A typical Blazor Web App solution (SSR with optional interactive modes) might look like this:
src/
  MyApp/                # ASP.NET Core host (also renders SSR)
    Components/
      App.razor         # Root component
      Layouts/
      Pages/
      Shared/
    wwwroot/
    Program.cs
  MyApp.Client/         # (Optional) WASM-specific assets/components
  MyApp.Core/           # Shared models, services, DTOs
Minimal Program.cs (Blazor Web App)
var builder = WebApplication.CreateBuilder(args);

builder.Services.AddRazorComponents()
    .AddInteractiveServerComponents()    // opt-in to Server interactivity
    .AddInteractiveWebAssemblyComponents(); // opt-in to WASM interactivity

builder.Services.AddHttpClient();
builder.Services.AddScoped<WeatherService>();

var app = builder.Build();

if (!app.Environment.IsDevelopment())
{
    app.UseExceptionHandler("/Error");
}

app.UseStaticFiles();
app.MapRazorComponents<App>()
    .AddInteractiveServerRenderMode()
    .AddInteractiveWebAssemblyRenderMode();

app.Run();
Minimal Program.cs (WASM Standalone)
using Microsoft.AspNetCore.Components.WebAssembly.Hosting;

var builder = WebAssemblyHostBuilder.CreateDefault(args);
builder.RootComponents.Add<App>("#app");

builder.Services.AddScoped(sp => new HttpClient
{
    BaseAddress = new Uri(builder.HostEnvironment.BaseAddress)
});

builder.Services.AddScoped<WeatherService>();

await builder.Build().RunAsync();
Components (props, events, slots)
A first component with parameters & events
@* Components/Counter.razor *@
<div class="p-3 border rounded">
  <h3>Counter (@Title)</h3>
  <p>Current: @count</p>
  <button class="btn btn-primary" @onclick="Increment">+1</button>
</div>

@code {
    [Parameter] public string Title { get; set; } = "Demo";
    [Parameter] public EventCallback<int> Changed { get; set; }

    private int count;

    private async Task Increment()
    {
        count++;
        await Changed.InvokeAsync(count);
    }
}
Using RenderFragment (slots) and child content
@* Components/Card.razor *@
<div class="card m-2">
  <div class="card-header">@Header</div>
  <div class="card-body">
    @ChildContent
  </div>
</div>

@code {
    [Parameter] public RenderFragment? Header { get; set; }
    [Parameter] public RenderFragment? ChildContent { get; set; }
}
<Card>
  <Header><strong>Weather</strong></Header>
  <p>It’s sunny today.</p>
</Card>
Cascading values
@* App.razor *@
<CascadingValue Value="_theme">
    <Router AppAssembly="typeof(App).Assembly" />
</CascadingValue>

@code {
    private Theme _theme = new("light");
}
public record Theme(string Name);
@* Components/Title.razor *@
<h2 class="mb-3">@Text (@Theme?.Name)</h2>

@code {
    [Parameter] public string Text { get; set; } = string.Empty;
    [CascadingParameter] public Theme? Theme { get; set; }
}
Lifecycle in practice
Common hooks:
OnInitialized{Async}– fetch initial data.OnParametersSet{Async}– react to parameter changes.OnAfterRender{Async}– DOM is available; good for JS interop.ShouldRender– skip re-render if nothing changed.
Routing, layouts, and navigation
Routing
@page "/orders/{id:int}"
@inject NavigationManager Nav

<h2>Order @Id</h2>
<button @onclick="() => Nav.NavigateTo($"/orders/{Id}/edit")">Edit</button>

@code {
    [Parameter] public int Id { get; set; }
}
Layouts
@* Shared/MainLayout.razor *@
@inherits LayoutComponentBase

<div class="container">
  <NavMenu />
  <main class="mt-3">
    @Body
  </main>
</div>
Apply layout per page:
@layout MainLayout
Data binding & forms (the “feel-good” part)
One-way, two-way, and formatting
<input @bind="search" @bind:event="oninput" placeholder="Search..." />
<p>You typed: @search</p>

<input type="date" @bind="birthday" @bind:format="yyyy-MM-dd" />

@code {
    private string? search;
    private DateTime birthday = DateTime.Today;
}
Forms & validation with EditForm
@using System.ComponentModel.DataAnnotations

<EditForm Model="@person" OnValidSubmit="Save">
    <DataAnnotationsValidator />
    <ValidationSummary />

    <div class="mb-2">
        <label>Name</label>
        <InputText class="form-control" @bind-Value="person.Name" />
        <ValidationMessage For="() => person.Name" />
    </div>

    <div class="mb-2">
        <label>Age</label>
        <InputNumber class="form-control" @bind-Value="person.Age" />
        <ValidationMessage For="() => person.Age" />
    </div>

    <button class="btn btn-success" type="submit">Save</button>
</EditForm>

@code {
    private Person person = new();

    private Task Save()
    {
        // Normally call an API here
        Console.WriteLine($"Saved {person.Name} ({person.Age})");
        return Task.CompletedTask;
    }

    public class Person
    {
        [Required, StringLength(50)]
        public string Name { get; set; } = string.Empty;

        [Range(0, 130)]
        public int Age { get; set; }
    }
}
Tip: Prefer input components (
InputText,InputNumber, etc.) over bare<input>when usingEditFormso validation and value parsing “just work”.
Dependency Injection, HTTP, and configuration
Register services
// Program.cs
builder.Services.AddHttpClient();
builder.Services.AddScoped<IWeatherApi, WeatherApi>();
Inject into components
@inject IWeatherApi Api

<ul>
  @foreach (var f in forecasts)
  {
    <li>@f.Date.ToShortDateString(): @f.Summary (@f.TemperatureC °C)</li>
  }
</ul>

@code {
  private WeatherForecast[] forecasts = [];

  protected override async Task OnInitializedAsync()
  {
      forecasts = await Api.GetAsync();
  }
}
Service implementation (shared in Core)
public interface IWeatherApi
{
    Task<WeatherForecast[]> GetAsync();
}

public sealed class WeatherApi(HttpClient http) : IWeatherApi
{
    public async Task<WeatherForecast[]> GetAsync()
        => await http.GetFromJsonAsync<WeatherForecast[]>("api/weather")
           ?? Array.Empty<WeatherForecast>();
}

public record WeatherForecast(DateTime Date, int TemperatureC, string Summary);
Server vs WASM: In Server,
HttpClientcalls are local to the server; in WASM they call remote endpoints – plan CORS/auth accordingly.
State management (what lives where)
- Per-component: fields/
@code– resets on navigation. - Cascading state: use
CascadingValueor a state container service. - Persist locally (WASM/SSR): localStorage/sessionStorage via JS interop or
ProtectedLocalStorage(for encrypted cookies in Server). - Server circuits (Server/SSR interactive): user state is in memory per connection; plan for reconnects.
Simple state container
public class CartState
{
    private readonly List<string> _items = new();
    public IReadOnlyList<string> Items => _items;
    public event Action? Changed;

    public void Add(string sku)
    {
        _items.Add(sku);
        Changed?.Invoke();
    }
}
// Program.cs
builder.Services.AddScoped<CartState>();
@inject CartState Cart

<button @onclick="() => Cart.Add("SKU-123")">Add to cart</button>
<p>Items: @Cart.Items.Count</p>

@code {
    protected override void OnInitialized()
        => Cart.Changed += StateHasChanged;

    public void Dispose() => Cart.Changed -= StateHasChanged;
}
JavaScript interop (only when it helps)
Import an ES module and call a function
@inject IJSRuntime JS

<button @onclick="FocusSearch">Focus search</button>

@code {
    private IJSObjectReference? _module;

    protected override async Task OnAfterRenderAsync(bool firstRender)
    {
        if (firstRender)
        {
            _module = await JS.InvokeAsync<IJSObjectReference>(
                "import", "./js/utils.js");
        }
    }

    private async Task FocusSearch()
        => await _module!.InvokeVoidAsync("focusElementById", "search");
}
// wwwroot/js/utils.js
export function focusElementById(id) {
  document.getElementById(id)?.focus();
}
Call .NET from JS
public class VersionInfo
{
    [JSInvokable]
    public static string GetVersion() => "1.0.0";
}
import("./_framework/blazor.web.js").then(() => {
  DotNet.invokeMethodAsync("MyApp", "GetVersion")
        .then(v => console.log("Version:", v));
});
Interop rule: Keep it thin and explicit. If you need heavy client JS, consider an island approach (embed a JS widget inside a Blazor component boundary).
Performance playbook
- SSR first render: Use the Blazor Web App template for fast TTFB.
- Streamed rendering: Render above-the-fold content first, then hydrate.
- Virtualization: Use
<Virtualize>for large lists. - Key your lists:
@keyprevents DOM churn on reorders. - Throttle inputs: Use
@bind:event="oninput"and debounce in JS if needed. - AOT for WASM: Enable ahead-of-time compilation for CPU-heavy apps to cut runtime overhead.
- Trimming & lazy loading: Ship only used assemblies; lazy load feature modules.
- Images & static assets: CDN + cache headers; prefer modern formats (webp/avif).
AOT publish (WASM)
dotnet publish -c Release -p:RunAOTCompilation=true
Virtualize example
<Virtualize Items="people" ItemSize="36" Context="p">
  <div>@p.Name (@p.Age)</div>
</Virtualize>

@code {
    private List<Person> people = Enumerable.Range(1, 10_000)
        .Select(i => new Person { Name = $"User {i}", Age = 20 + (i % 40) })
        .ToList();
}
Authentication & security
- Server/SSR: Use ASP.NET Core auth; cookies flow naturally; server-guard sensitive ops.
- WASM: Use OAuth/OIDC (PKCE) against an identity provider; store tokens safely (avoid localStorage when possible; prefer
AuthorizationMessageHandlerandIHttpClientFactory). - Authorization: Policies &
[Authorize]at component or route level. - Input validation: Never trust client-only validation; revalidate on the server.
- Secrets: Keep keys server-side; call the server from WASM to proxy sensitive operations.
Testing your components
- Unit tests: Use bUnit to render components, assert markup, and inject services.
- Integration/E2E: Use Playwright to click through pages and assert UI behavior.
- Services: Mock
HttpClientwithHttpMessageHandlerstubs.
Example bUnit snippet:
using Bunit;
using Xunit;

public class CounterTests : TestContext
{
    [Fact]
    public void Increment_UpdatesCount()
    {
        var cut = RenderComponent<Counter>(p => p.Add(c => c.Title, "Test"));
        cut.Find("button").Click();
        cut.Markup.Contains("Current: 1");
    }
}
Deployment
- Blazor Server/SSR: Deploy like any ASP.NET Core app (Kestrel behind Nginx/IIS/Load Balancer). Scale out requires sticky sessions or Redis-backed circuits when needed.
- WASM: Static hosting (Azure Static Web Apps, GitHub Pages, S3+CloudFront, Cloudflare Pages). Point API calls to your backend; enable CORS.
- CI/CD:
dotnet publish-> containerize -> push to registry -> deploy. Cache~/.nuget/packagesto speed builds.
A tiny end-to-end example
Let’s build a Todo with shared model, server API, and WASM/SSR UI.
Shared model
public record TodoItem(Guid Id, string Title, bool Done);
Server endpoint
app.MapGroup("/api/todos").MapTodos();

static class TodoEndpoints
{
    public static RouteGroupBuilder MapTodos(this RouteGroupBuilder group)
    {
        var items = new List<TodoItem>();

        group.MapGet("/", () => items);
        group.MapPost("/", (TodoItem item) => { items.Add(item); return Results.Created($"/api/todos/{item.Id}", item); });
        group.MapPost("/{id:guid}/toggle", (Guid id) =>
        {
            var i = items.FirstOrDefault(x => x.Id == id);
            if (i is null) return Results.NotFound();
            var updated = i with { Done = !i.Done };
            items[items.IndexOf(i)] = updated;
            return Results.Ok(updated);
        });

        return group;
    }
}
UI component
@inject HttpClient Http

<h3>Todos</h3>

<InputText @bind-Value="title" placeholder="What needs to be done?" />
<button class="btn btn-primary" @onclick="Add">Add</button>

<ul>
  @foreach (var t in items)
  {
    <li>
      <input type="checkbox" checked="@t.Done" @onchange="() => Toggle(t)" />
      @t.Title
    </li>
  }
</ul>

@code {
    private string title = string.Empty;
    private List<TodoItem> items = new();

    protected override async Task OnInitializedAsync()
        => items = await Http.GetFromJsonAsync<List<TodoItem>>("/api/todos") ?? new();

    private async Task Add()
    {
        if (string.IsNullOrWhiteSpace(title)) return;
        var item = new TodoItem(Guid.NewGuid(), title.Trim(), false);
        var resp = await Http.PostAsJsonAsync("/api/todos", item);
        if (resp.IsSuccessStatusCode)
        {
            items.Add(item);
            title = string.Empty;
        }
    }

    private async Task Toggle(TodoItem item)
    {
        var resp = await Http.PostAsync($"/api/todos/{item.Id}/toggle", null);
        if (resp.IsSuccessStatusCode)
        {
            var updated = await resp.Content.ReadFromJsonAsync<TodoItem>();
            var idx = items.FindIndex(x => x.Id == item.Id);
            if (idx >= 0 && updated is not null) items[idx] = updated;
        }
    }
}
Common pitfalls (and how I avoid them now)
- Over-hydrating everything: Don’t make every page interactive. Keep static pages SSR-only.
- Putting secrets in WASM: Never. Proxy via your server.
- Ignoring reconnects (Server): Add
<ReconnectDisplay />and handle transient state gracefully. - Huge payloads (WASM): Trim assemblies, lazy load, use AOT only when it pays off.
- Chatty renders: Use
@key, memoize computed values, and avoid expensive work inBuildRenderTree.
FAQ: Blazor basics & decisions
Yes. I’ve shipped multiple apps. Choose the right hosting model and mind perf.
Absolutely – host components inside Razor Pages/Views or link to Blazor routes.
Use SSR for crawlable HTML. Hydrate interactivity where needed.
Often less, not zero. Use JS interop for niche browser APIs or specialized widgets.
Put DTOs in a shared project/package referenced by both.
Use WASM + IndexedDB + service workers. Cache APIs via background sync where appropriate.
Server: normal .NET debugging. WASM: browser devtools + .NET debugger over WebAssembly.
Server: SignalR is already in the loop. WASM: call SignalR from the client.
Bootstrap-based libs work well. Pick one and stay consistent.
Conclusion: Build full-stack web apps in pure C#
Blazor lets you write one set of components and choose where they run – server, browser, or both. With SSR for speed, Server for productivity, and WASM for reach, you can fit nearly any web scenario while staying in C#. Start with a Blazor Web App, hydrate where it matters, and keep your interop thin.
Your move: clone a template, wire a simple API, and ship your first feature this week. Which hosting model will you pick and why? Share it in the comments – I read them all.